
本教程将从镜像构建,容器编排,容器通信来部署实现一个基于nodejs+eggjs+mysql+nginx+react的前后端分离项目
从一个小demo来从无到有搭建一个完整的项目
以下所有代码均可直接访问,地址 https://gitee.com/passerma/docker-node-nginx-mysql-redis
一、前端界面搭建
1.前端代码预览
前端使用react框架搭建,具体源码请自行浏览,地址 https://gitee.com/passerma/docker-node-nginx-mysql-redis/tree/master/web
2.前端接口调用
前端接口调用统一使用/api作为前缀,后面好通过nginx代理来访问后端服务
开发时代理到http://localhost:7001
package.json
"proxy":"http://localhost:7001"内置登录和获取用户接口
src/App.tsx
import React, { useRef, useState } from "react";
import "./App.css";

function App() {
  const token = useRef('')
  const [data, setdata] = useState<{ id: number, userName: string }[]>([])

  const login = async () => {
    const userName = 'root'
    const passwd = 'admin_123'
    const response = await fetch('/api/login', {
      method: 'POST',
      headers: {
        'Content-Type': 'application/json'
      },
      body: JSON.stringify({
        userName,
        passwd
      })
    });
    response.json().then(res => {
      token.current = res.token
    });
  }

  const getData = async () => {
    if (!token.current) {
      alert('请先登录!')
    } else {
      const response = await fetch('/api/list', {
        method: 'POST',
        headers: {
          'Content-Type': 'application/json',
          'token': token.current
        },
      });
      response.json().then(res => {
        if (res.errCode === 0) {
          setdata(res.data)
        }
      });
    }
  }

  return (
    <div className="App">
      <button onClick={login}>登录</button>
      <button onClick={getData}>获取数据</button>
      {
        data.length > 0 && <ul>
          {
            data.map(res => <li key={res.id}>
              {res.userName}
            </li>)
          }
        </ul>
      }
    </div>
  );
}

export default App;
其余关于数据处理即展示请查看源码
二、后端代码编写
1.后端代码预览
后端使用eggjs框架,具体源码请自行浏览,地址 https://gitee.com/passerma/docker-node-nginx-mysql-redis/tree/master/server/server
2.后端接口编写
后端使用eggjs框架,实现了两个接口,即登录和获取用户接口
其中登录接口会将生成的token存入redis
然后获取用户接口需要携带token来经redis校验获取用户数据
接口如下,包含/api/login和/api/list
app\router.ts
import { Application } from 'egg';

export default (app: Application) => {
  const { controller, router } = app;

  router.post('/api/login', controller.home.login);
  router.post('/api/list', controller.home.list);
};其余关于接口的编写、连接mysql数据库、读取redis和mysql的数据请查看源码
3.配置文件编写
配置文件主要是配置开发环境和生产环境的redis和mysql链接的
1)开发环境配置
使用本地的redis和mysql
config\config.local.ts
import { EggAppConfig, PowerPartial } from 'egg';

export default () => {
  const config: PowerPartial<EggAppConfig> = {};
  config.redis = {
    client: {
      port: 6379,
      host: '127.0.0.1',
      password: '',
      db: 0,
    },
  };
  config.mysql = {
    client: {
      host: '127.0.0.1',
      port: '3306',
      user: 'root',
      password: 'admin_123',
      database: 'test',
    },
    app: true,
    agent: false,
  };
  return config;
};
2)生产环境配置
使用生产环境下,使用redis镜像和mysql
config\config.prod.ts
import { EggAppConfig, PowerPartial } from 'egg';

export default () => {
  const config: PowerPartial<EggAppConfig> = {};
  config.redis = {
    client: {
      port: 6379,
      host: 'redis',
      password: '',
      db: 0,
    },
  };
  config.mysql = {
    client: {
      host: 'mysql',
      port: '3306',
      user: 'root',
      password: 'admin_123',
      database: 'test',
    },
    app: true,
    agent: false,
  };
  return config;
};
其中redis的host: "redis" 代表redis镜像构建的容器名
其中mysql的host: "mysql" 代表mysql镜像构建的容器名
之后可以通过构建相同网桥的形式来使用容器名进行容器间的通信
三、Dockerfile文件编写
1.nginx镜像构建
Dockerfile文件如下
FROM nginx
COPY default.conf /etc/nginx/conf.d/default.conf
ADD build/ /usr/share/nginx/build其中default.conf即为nginx的配置文件,**/etc/nginx/conf.d/**为配置文件目录
/usr/share/nginx/static为静态文件目录
default.conf
server {
    listen       80;
    listen  [::]:80;
    server_name  localhost;

    #access_log  /var/log/nginx/host.access.log  main;

    location /api {
      proxy_set_header  Host $host;
      proxy_set_header  X-Real-IP $remote_addr;
      proxy_set_header  X-Forwarded-Proto https;
      proxy_set_header  X-Forwarded-For $remote_addr;
      proxy_set_header  X-Forwarded-Host $remote_addr;
	    proxy_pass http://server:7001;
    }

    location / {
        root   /usr/share/nginx/build;
        index  index.html index.htm;
    }

    #error_page  404              /404.html;

    # redirect server error pages to the static page /50x.html
    #
    error_page   500 502 503 504  /50x.html;
    location = /50x.html {
        root   /usr/share/nginx/html;
    }

    # proxy the PHP scripts to Apache listening on 127.0.0.1:80
    #
    #location ~ \.php$ {
    #    proxy_pass   http://127.0.0.1;
    #}

    # pass the PHP scripts to FastCGI server listening on 127.0.0.1:9000
    #
    #location ~ \.php$ {
    #    root           html;
    #    fastcgi_pass   127.0.0.1:9000;
    #    fastcgi_index  index.php;
    #    fastcgi_param  SCRIPT_FILENAME  /scripts$fastcgi_script_name;
    #    include        fastcgi_params;
    #}

    # deny access to .htaccess files, if Apache's document root
    # concurs with nginx's one
    #
    #location ~ /\.ht {
    #    deny  all;
    #}
}
修改静态文件目录为/usr/share/nginx/build,
增加代理/api到node容器的7001端口
同时将打包编译的build文件拷贝到静态目录下
2.nodejs和eggjs镜像构建
Dockerfile文件如下
FROM alpine
ADD server/ /usr/local/node-server
WORKDIR /usr/local/node-server
RUN apk add nodejs npm && npm install -g cnpm --registry=https://registry.npm.taobao.org && cnpm i && npm run tsc
CMD ["npm","start"]
由于官方的node镜像十分之大,因此这里我们通过alpine来构建一个nodejs环境
同时我们将后台相关文件放在server文件,并拷贝至镜像/usr/local/node-server目录下
然后设置npm start为容器启动时的命令
3.mysql镜像构建
Dockerfile文件如下
FROM mysql:5.7
COPY create_table.sql /docker-entrypoint-initdb.d
我们在启动MySQL容器时自动创建我们需要的数据库和表
对应的sql文件为create_table.sql,并移动到容器/docker-entrypoint-initdb.d下
create_table.sql
CREATE DATABASE IF NOT EXISTS `test`;
USE `test`;
CREATE TABLE IF NOT EXISTS `users` (
  `id` INT(11) UNSIGNED AUTO_INCREMENT,
  `userName` VARCHAR(255) NOT NULL,
  PRIMARY KEY (`id`)
) ENGINE = InnoDB DEFAULT CHARSET = utf8mb4 COLLATE = utf8mb4_unicode_ci;
mysql官方镜像中提供了容器启动时自动docker-entrypoint-initdb.d下的脚本的功能
4.redis镜像构建
redis使用默认的官方镜像即可
四、docker-compose实现容器编排
1.整理目录结构
在使用容器编排前,需要先整理下我们的目录结构
web ----- 前端项目文件,与docker-compose无关,仅用于生成build里的静态文件
mysql------ Dockefile mysql镜像的Dockefile文件
nginx ------ Dockefile nginx镜像的Dockefile文件
------ build 前端打包后的静态文件
server----- Dockefile node环境及后台服务镜像的Dockefile文件
----- server eggjs文件目录,提供后台服务
docker-compose.yml docker-compose的配置文件
2.安装docker-compose
下载docker-compose
sudo curl -L"https://github.com/docker/compose/releases/download/1.24.1/docker-compose-$(uname -s)-$(uname -m)" -o/usr/local/bin/docker-compose设置docker-compose执行权限
sudo chmod +x/usr/local/bin/docker-compose创建软链
sudo ln -s/usr/local/bin/docker-compose/usr/bin/docker-compose测试是否安装成功:
docker-compose --version
cker-composeversion1.24.1, build4667896b
3.编写docker-compose.yml文件
完整的docker-compose.yml文件如下
其中配置文件详解如下
docker-compose.yml
version: "3.0"

services:
    redis:
        container_name: redis
        image: redis
        ports:
            - "6379:6379"
        restart: on-failure
        networks:
            - my-server

    mysql:
        container_name: mysql
        build:
            context: mysql
            dockerfile: Dockerfile
        ports:
            - "3306:3306"
        restart: on-failure
        environment:
            - MYSQL_ROOT_PASSWORD=admin_123
        networks:
            - my-server

    server:
        container_name: server
        build:
            context: server
            dockerfile: Dockerfile
        ports:
            - "7001:7001"
        restart: on-failure
        networks:
            - my-server
        depends_on:
            - redis
            - mysql

    nginx:
        container_name: nginx
        build:
            context: nginx
            dockerfile: Dockerfile
        ports:
            - "80:80"
        restart: on-failure
        networks:
            - my-server
        depends_on:
            - redis
            - mysql
            - server

networks:
    my-server:
server中的redis为官方镜像,直接启动即可,同时设置自动重启
使用专属网桥my-server
server中的mysql为自己编译的mysql镜像
其中MYSQL_ROOT_PASSWORD为root的用户密码,需设置与mysql配置文件里的一致
build里指定了Dockerfile目录
使用专属网桥my-server
server中的server为自己编译的nodejs服务镜像
build里指定了Dockerfile目录
使用专属网桥my-server
node服务依赖于mysql和redis
同时设置自动重启,这一步必须设置,主要是存在mysql还没有启动完成就启动了node服务
会导致后台服务无法启动从而退出,这时再重启直到连接数据库成功为止
server中的nginx为自己编译的前端服务镜像
build里指定了Dockerfile目录
使用专属网桥my-server
同时设置自动重启,这一步必须设置,主要是存在node还没有启动完成就启动了nginx服务
会导致连接不上node的host而退出,这时再重启直到代理到node地址成功为止
最后声明一下网桥 my-server
将所有服务都挂载在同一网桥即可通过容器名来互相通信了
至此docker-compose配置文件编写完成,直接后台启动即可
docker-compose up -d启动完成,查看容器是否都正常运行
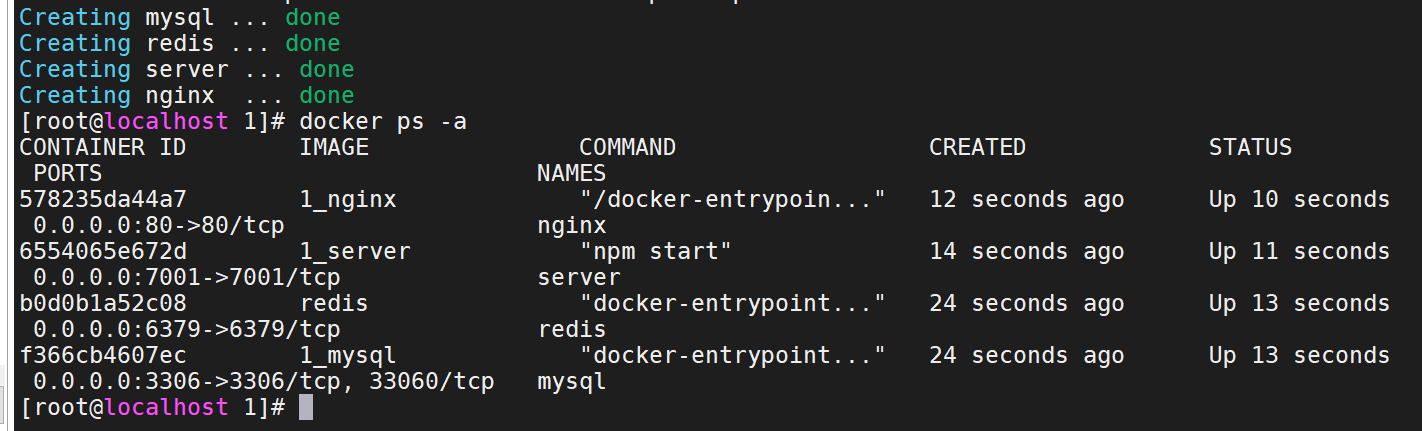
输入宿主机ip查看界面
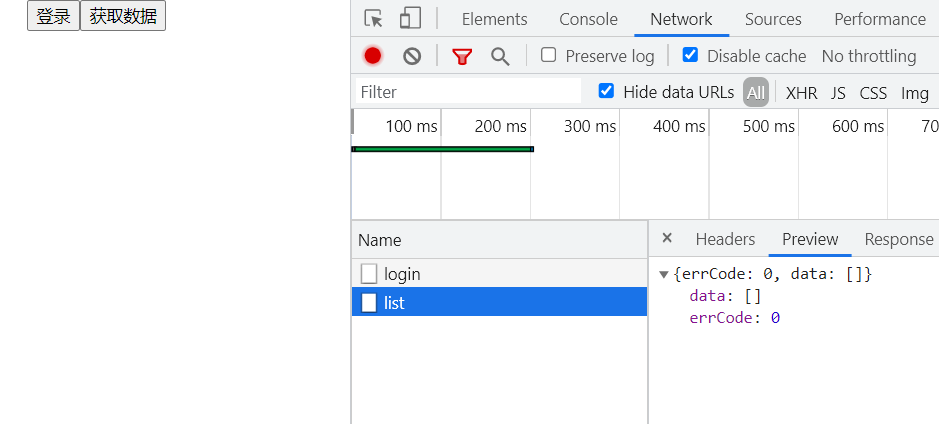
点击登录,然后点击获取数据,流程畅通
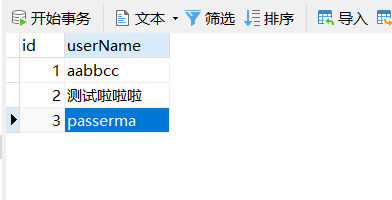
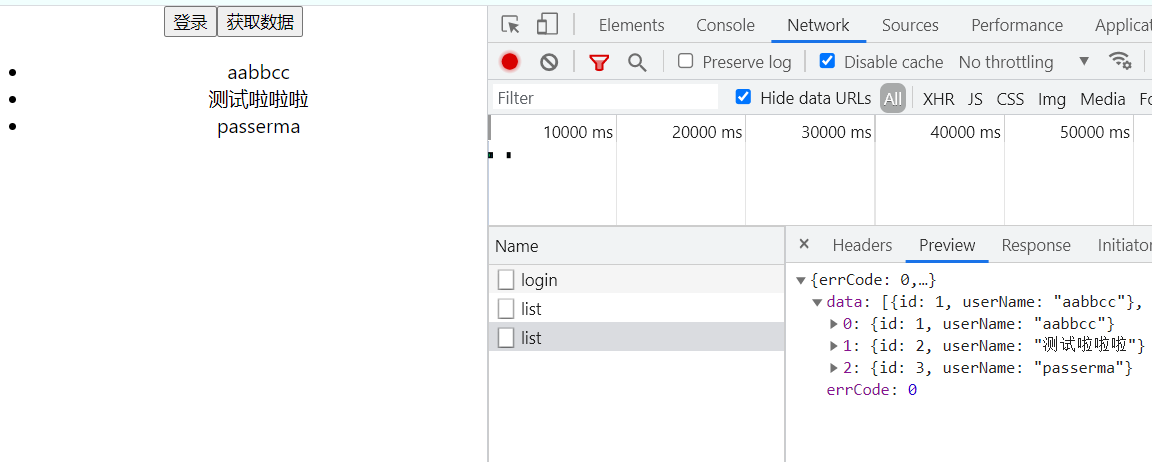
这时我们可以通过宿主机ip:3306连接数据库,在users表添加几条数据再次点击获取数据,可以查询到刚添加的记录
五、总结
至此,整个项目的环境就搭建完成了,不过还是有许多需要优化的地方,比如通过shell脚本来控制数据库完全启动再启动node服务,而不是一直重启node直到连接上为止
之后只需要一步步完善整个流程即可实现更为复杂的项目